Thursday 30 October 2008

Challenged

I'm not really one for doing challenges, I like to look but never take take part, but on my usual rounds of blog hopping I came across Kristina Werner's Color Inspiration #28. Kristina's blog is a fave of mine, I love her simple style and flare for colours and when I saw the colours for this week - well I had to have a go. 
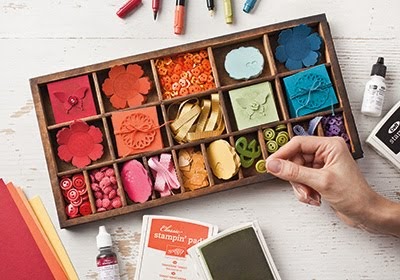
I didn't have very much Pumpkin Pie cardstock but found a piece in my 'scrapbox' that was just enough to use as a teeny 3x3. I made the scalloped square from the border punch (see this post for tutorial), heat embossed the square frame (Frames with a Flourish) with white embossing powder and broke open the every so cute tin of felt Accents and Elements for the flowers. I have to hold my hands up and admit that the white flower brads aren't Stampin'Up (I generally only use SU! stuff on my blog) but they went so well with this dinky card I thought, oh well.

These colours are fab, love 'em, so I'm going to do another of the 3x3 box sets using them. Just need to get some more pumpkin pie....

Ta for looking,

Jo :)

Tuesday 28 October 2008

Tags for All

If you're into making crafty projects to sell at Christmas Craft Fairs then the 'Tags for All' set is ideal. I made these tag sets up really quickly last week, bagged them and made the very simple bag topper with just a few pieces of card. I hate buying tags at Christmas time so all my tags will be made this way from now on. And the spotty one can be used for any occasion. Love the NEW elastic cord too - it comes in Gold or Silver and at £3.50 for 23 metres (15p metre), it's a bargain!
Hope you like,
Jo :)

Monday 27 October 2008

Another from 'a Rose is a Rose'

Last week whilst pondering a technique I could show at Linda's workshop, I saw the most gorgeous card made by Julie over at In Love With Stamping. Isn't it beautiful?! So I 'cased' the idea and came up with this.
A Rose is a Rose is a 'Two Step' stamping set and is aided with the Stamp-a-ma-jig (SAMJ). It's a very clever little gadget that will enable you to stamp on stamp with precision. Once you've cut out those beautiful roses and leaves, they look fantastic 3D'd onto a card. I was going to add some Dazzling Diamonds...in fact I think I'll go back and do that now - love a bit of bling.
The colours for the card are, Rose Red, Pretty in Pink, Certainly Celery, Old Olive and the sentiment was stamped in Basic Grey.
Ta for looking,
Jo :)

Friday 24 October 2008

Scallop Edge Square Tutorial

I've finally done the tutorial I've been harping on about over the last few days. It came to me in a *light bulb* moment last week when I was doing the lid for this 3x3 mini box. I've perfected the technique now so I thought I'd share how it's done. Fingers crossed you understand my instructions..... All you need, besides your Stampin'Up! Scallop Edge Border Punch, is a pencil and ruler.
Cut your cardstock to whatever size you want. It doesn't have to be square, it works just the same on a rectangular piece.
All the edges will be punched whilst viewing from the underside so you can see where you are punching. Line up the first edge of c/s so the corner meets the start of the scalloped area in view. Continue the rest of that edge punching as you usually would. On the next side, draw a line all the way down from the bottom point of you last full scallop. I use the grid paper to make sure my pencil line is dead straight, if it's not you will end up with a wonky square. Place your cardstock back into the punch but so it doesn't hit the back guard. You will be using the pencil line as your guide. Make sure the pencil line is at the top of the scallops. (This photo is not that clear so hope you get what I mean.) And most importantly, as this is what we are trying to achieve, the corner scallop on the cardstock must be lined up with the first full scallop on the punch. And this is what you should have. Continue to do the same as above, pencilling in a very straight line down the side of your card.... ... lining the corner scallop with a full one and using the pencil line as your guide... ...and again for your last one.....
..... and TA DA!!! One beautifully perfect scalloped square... or rectangle in my case.

So there you have it! I hope this can be of some use and I'd love to hear if it works for you.

I'll be quiet for a few days as I've got some DT work to do but I hope to post a few more bits from last nights workshop real soon.

Don't forget, let me know how you get on with the above....

Cheers!

Jo :)

Thursday 23 October 2008

Tea & Crumpets

It's been a mad few days but I've managed to squeeze in a bit of photography today. I've done the photos for the scallop border square/rectangle tutorial and I'll do my best to get it posted for tomorrow. Right now I need to do some serious tidying up in my craft room. There's bits of paper everywhere, and I can't even see my desk for clutter!
But for now, here's a decorated candle I made using some of the odd bits left over from last Sunday's post - The Pocket Silhouette Purse and Card Set here.
Be back tomorrow.
Cheers!
Jo :)

Wednesday 22 October 2008

Nothing to to post today I'm afraid. I'm frantically getting everything together for the workshop tonight. I'll be back tomorrow. And don't forget that tutorial on creating a scalloped square with your Scallop Border Punch.... coming real soon! Jo :)

Tuesday 21 October 2008

Cute little Batty's!

As it's Halloween next week I thought I'd have a go at making these very cute sour cream containers for the occasion. They really caught my eye when I saw the tutorial by Beate over at Splitcoast and since then I've made loads. They're really quick and easy to do and the kids will love them!
Unfortunatley we don't have any Halloween stamps in the new catalogue so after seeing a really clever idea here on how to make this adorable litte Batty using the square scallop punch, I had to have a go. I shall be showing my ladies tomorrow night - hope they like M&M's!
A very quick post today as I really need to walk my pup, but I just wanted to thank everyone for stopping by my blog. I've received so many lovely emails over the last couple of days and I only thought it right I should show my gratitude. One lady, Charmaine, emailed me yesterday to ask how I managed to make neat scalloped corners on a random piece of square cardstock. I tried to explain but it all sounded a bit complicated, which it isn't, so I've going to show a tutorial on how it's done over the next week. So if you'd like to know how to do it, staaaaayed tuned!
Tfl and have a great day!
Jo :)

Monday 20 October 2008

A Rose is a Rose

I really should be doing the dreaded *H* word today but I wanted to show you a set that if you're an SU! blog hopper, you will no doubt start to see a lot of. It's called 'a Rose is a Rose'. For those that like to do the cutting out thing, which I do although I'm not a *decoupage* person, then this is ideal. The stamps are a '2 Step' set which basically means you build the image with 2 stamps and 2 colours - also helped with that clever gadget the 'stamp-a-ma-jig'.
I can't help but stick to these gorgeous colours of red and green, but I did try to change it slightly by using Real Red instead of Ruby Red and Certainly Celery instead of Old Olive. I also used some scraps from the Holiday Treasures Designer papers (again) - I can't bare to throw even the smallest of scraps of theses gorgeous papers away! The sentiment is from the Level 1 Hostess set - Best Yet and it's stamped in one of the Frames with a Flourish set.
Have a great day and thanks for stopping by.
Jo :)

Sunday 19 October 2008

More Pocket Silhouettes

,
How about some Tea and Crumpets? Perfect for a Sunday afternoon don't you think? That's what the Designer Papers are called on this purse and card set. Yum! Such pretty colours which go so well with the delicate Pocket Silhouette stamp set. The colours are Pretty in Pink, Close to Cocoa, Always Artichoke and Barely Banana, although it's supposed to be So Saffron but I didn't have it in my stash. It's very close to So Saffron though and still looks beautiful. The images are stamped in Choc Chip.
The Purse and Cards set were one of the classes on UStamp last round. I've had to modify the purse to fit envelopes and I've also added ribbon for the handles instead of the circle punches but its a great project. I haven't yet signed up for the Christmas UStamp but I think I will now I've started creating these adorable projects.
TFL.
Jo :)

Friday 17 October 2008

Pocket Silhouettes

I'm busy preparing for a workshop next week and there are so many wonderful products in the New catalogue that I've been making lots of things to show everyone. There's some very nice new stamp sets in this catalogue and what I love is the majority of them are already die-cut. It's really easy and tons quicker. By the way if you wish to purchase the new catalogue, details are on the left hand sidebar.
I love making these cute little 3x3 boxes - the instructions can be found over at Splitcoast. I'm being very lazy and haven't linked direct to the instructions and the person to credit, so sorry about that. This set is made using the gorgeous Holiday Treasures Designer papers along with the Pocket Silhouettes stamp set. I've also incorporated the scallop square punch... oh ,and of course the Scallop Border Punch! ha ha! I told you I'd be using it all the time now. :) The colours for the box and cards are Old Olive, Ruby Red and Chocolate chip with a touch of Very Vanilla cardstock and Pretty in Pink ribbon.
'Scuse the junk in the background, I didn't have the energy to go downstairs to take the photo so it's taken in my craft room.
Anyway, hope you like.
Jo

Tuesday 14 October 2008

The So Swirly wheel is beautiful

My friend Marian became a granny for the first time over the weekend. Grace was born on Saturday morning weighing only 6lb 5ozs. Congratulations Belinda and Tim! And of course congrats to Marian too who has been desperate for a grandchild for many years. In fact she has been surrogate Nanna to Jake for a few years now - she loves him to bits and vice versa. I have some new arrivals too..... oh yes, some of the sets from the 2008-2009 Idea Book and Catalogue landed on my doorstep on Friday afternoon. With a special occasion to celebrate I created this card for the proud parents. I absolutely love the new So Swirly Jumbo wheel, it's gorgeous! I can see me using this on lots more projects, especially as it goes so well with the Season of Joy set and with Christmas not too far away I'd better get going. I have an idea to use it with the Stampin'Up! gold embossing powder too - very classy so watch this space. The other stamps I used for this card are 'In the Stars'. A very versatile set which is great for boys/men as well as us girlies. And have you noticed the scalloped edges? I don't think I've mentioned it before (ahem!) but it's the fantastic Scallop Border Punch. All I will say is 'it's the best' and at only £10.95 it's a bargain! lol The colours on the card are Pretty in Pink, Barely Banana, and Bashful Blue. I haven't got any alphas yet so I used American Crafts Daquiri Thickers. At least I've made a little dent in my Thickers stash!
I've also played at making these little boxes. Aren't they adorable? Monica posted the instructions on the forum at In Love With Stamping They'll look even better when I've added some treats, ribbon and tags. Perfect as a small 'thank you' gift or favour.
Right, must get on. So much to do in so little time.....

Wednesday 8 October 2008

A True Friend

One of the pre-order sets from the new catalogue was a True Friend. It's so very different to what I would usually buy but I love them. So last night I had half hour to spare and made this card. The colours I used (Tempting Turquiose, Green Galore, Apricot Appeal and Gable Green) were inspired from the new 'Rainbow Sherbet' designer papers on p70 -really fresh and zingy. They're definately on my wishlist but for now I'll just have to play with the carstock and inks.
Thanks for looking,
Jo :)

Sunday 5 October 2008

Happy Birthday Stampin' Up!

It's Stampin'Up! 20th Birthday this year and from 1-31st October they have some Birthday Sets on offer with 20% off. Spend £20 plus p&p and you'll be able to purchase as many of the promotional sets below at the reduced rate. You only have to spend the £20 once so if you fancy all the sets on offer, you can purchase all of them at the reduced price.
page 32 Crazy for Cupcakes 20% off price £16.76
page 33 Birthday Best 20% off price £8.76
page 58 Cheer & Wishes 20% off price £11.96